OpenTX / EdgeTX Radios are very popular these days and work very well with the current generation of RC helicopters with Flybarless systems. Although this guide uses the OMPHobby M4 helicopter, it is applicable to any RC helicopter with a Flybarless system.
Receiver Selection
Choosing a reliable receiver is extremely important for a helicopter of this size. We highly recommend the Frsky R-XSR receiver due to the following benefits:

- Full range receiver
- Telemetry support
- Bidirectional F.PORT. Single cable between Receiver and Flybarless controller.
- Supports ACCST D16 (for Transmitters with multi-protocol modules) and ACCESS (Frsky proprietary) via firmware flash.
- Redundant receiver support
- Small size and light weight
NOTE: R-XSR receiver supports multiple firmware types. For proper operation with Brain2 we need to flash the firmware that supports FPORT interface. To match your Transmitter you will need either ACCST version or ACCESS version. Based on your region you will need either FCC or LBT. You can download the latest firmware from https://www.frsky-rc.com/r-xsr/
| Transmitter type | Europe | USA |
|---|---|---|
| cc2500/4-in-1 multi-module | RXSR_ACCST_2.1.1_Fport_LBT.frk | RXSR_ACCST_2.1.1_Fport_FCC.frk |
| Frsky ACCESS | RXSR_ACCESS_2.1.7.frsk | RXSR_ACCESS_2.1.7.frsk |
There are multiple ways to Flash the R-XSR. This is explained here.
Wiring and Mounting


- CH-3: Receiver F.PORT (shown in previous photo)
- CH-1: ESC Throttle + BEC
- SRV-1: Right Aileron Servo
- SRV-2: Elevator Servo
- SRV-3: Left Aileron Servo
- SRV-4: Tail Servo
- GOV+: RPM signal from ESC (Not required if using ESC telemetry protocol)
- 5: ESC Telemetry TX wire (Not required if using RPM signal from ESC)
Mount the gyro on the gyro plate using the provided 3M double sided tape. Ensure that Gyro is aligned properly with the helicopter frame. Ensure that USB port is easily accessible. In the above picture USB port is accessible even with the canopy installed.
WARNING: Remove Main and Tail rotor blades while performing the setup. The motor may accidentally start and we don’t want it to cause any injury or damage.
EdgeTX Setup and binding
Use the provided EdgeTX configuration file as a starting point.
Download TX16S EdgeTX configuration file for Brain2 with R-XSR. (Right-Click and Save Link As)
Download Zorro EdgeTX configuration file for Brain2 with R-XSR. (Right-Click and Save Link As)
To bind to the receiver perform the following steps
- Press and hold F/S button on the receiver while powering up the receiver. All 3 LEDs (red, green, blue) should be lit steady.
- On the Transmitter press MDL->Internal RF

- In Mode, choose MULTI, Frsky X2
- In RF Protocol, choose LBT(EU) for Europe or D16 for elsewhere.

- Select BIND on the Transmitter screen.
- The RED LED on the receiver will start flashing when binding completes.
- Power off and power on the Receiver. Green LED will be constantly lit indicating that receiver is bound to the transmitter.
NOTE:
The Frsky R-XSR receiver supports 2 output modes CPPM and SBUS/FPORT.
To use with Brain or Rotorflight the receiver should be in SBUS/FPORT mode.
BLUE LED OFF -> CPPM mode
BLUE LED ON -> SBUS/FPORT mode
Long press the F/S button on the receiver for 4 seconds and release to switch between CPPM and SBUS/FPORT mode. The BLUE LED will flash three times and remain steady ON when switched to SBUS/FPORT mode.
The BLUE LED will flash two times and remain OFF when switched to CPPM mode.
Brain / Ikon setup
For the first setup we recommend that you use the Windows configuration app and USB port. This is because USB is the most reliable connection for firmware updates and the Windows tool is very informative and easy to use.
The Brain unit gets power over USB port and we can do the firmware update and initial setup even before powering up the helicopter.
Download and install the Windows configuration app. If you do not have a Windows PC we recommend to borrow one from a friend for the initial setup.
After the Windows app is installed. Plug the Brain / Ikon to the Windows PC with a USB cable. Start the app and follow the instructions on the App. Make sure you update both Brain software on the PC and Brain software on the FBL unit to the latest version.
Gyro Orientation
Choose the Orientation to match your setup. In our case it is “Top up, wires front”
Receiver Protocol Selection

In our case we select F.Port Std-INVERTED for the Frsky R-XSR receiver.
Transmitter check
Power up the helicopter. This should provide power to the receiver.

Check that the stick movements match the controls and move all the way from -100% to +100%. In the above image Aileron stick to full right shows 100% on the App.
If they don’t then adjust the channel throws from the MDL->OUTPUTS page

Ensure that Extended Limits is enabled.

Adjust the Min and Max throw for the respective channel to get full throw from -100 to +100 when you move the respective control stick.
NOTE: Throttle channel will stay at -100 if throttle cut switch (SD or SF) is active. Even if throttle cut is deactivated, the throttle channel will remain fixed at around -9 as we have programmed a flat throttle curve for all flight modes.

To check that the throttle channel goes from -100 to +100 edit Normal mode throttle curve TCn to be a straight line from -100 to +100

Make sure you are in normal mode (Switch SE away). Now throttle channel should go from -100 to +100 on the app on throttle stick movement.
NOTE: Remember to Reset Normal Mode Throttle (TCn) back to original state.
Servo Setup

Swashplate Setup

This is where we need to do 3 important steps
- Swash plate leveling. See How to level your M4 Helicopter swash plate.
- Set Max Collective pitch. A Pitch gauge is useful for this.
- Set Max Cyclic ring.
Tail rotor setup

Follow the instructions to set midpoint, left throw and right throw.
Throttle output and Telemetry

Enter the correct numbers for “Pulses for rotation”, “Main gear ratio” and “Tail gear ratio”.
Select the correct “Telemetry input” protocol.
If you are not using ESC telemetry connection but only RPM signal from ESC then select “Basic RPM telemetry”
If you are using ESC telemetry connection then:
- For OMP Hobby ESC, select “Also OMP ESC Telemetry”
- For Scorpion Tribunus ESC, select “Also Scorpion Tribunus Telemetry”
Now you can Power up the ESC throttle calibration procedure for the ESC. Make sure the Main and tail rotor blades are removed. The Brain will map the the Throttle channel movement on the Transmitter to Throttle channel on the ESC within the specified Out MIN and Out MAX limits.
Telemetry sensors and EdgeTx
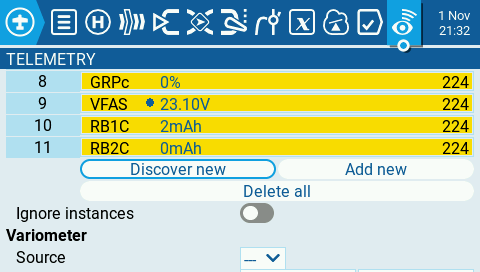
After binding to the Helicopter Receiver, go to the Telemetry page and select “Discover New”. Wait for 10 seconds till all the sensors are discovered. Below page shows some of the discovered telemetry sensors when using OMP Hobby ESC.

The various telemetry sensors for OMP Hobby ESC are explained below:
| Sensor Name | Function |
|---|---|
| Fuel | Global Vibrations |
| Curr | Instantaneous current (Very low on bench without rotor blades) |
| Tmp1 | ESC Temperature |
| GRPc | Power Out, the same as throttle with external governor, automatic with internal governor |
| VFAS | Telemetry Signal Strength |
| RB1C | Motor Consumed Current mAh |
| RB2C | BEC Consumed Current (not measured by OMP ESC) |
R-XSR Receiver also provides some Telemetry sensors:
| Sensor Name | Function |
|---|---|
| RSSI | Received Signal Strength Indicator |
| TRSS | Telemetry Signal Strength |
| TQly | Link Quality |
| RxBt | Receiver Battery. (i.e. BEC voltage) |
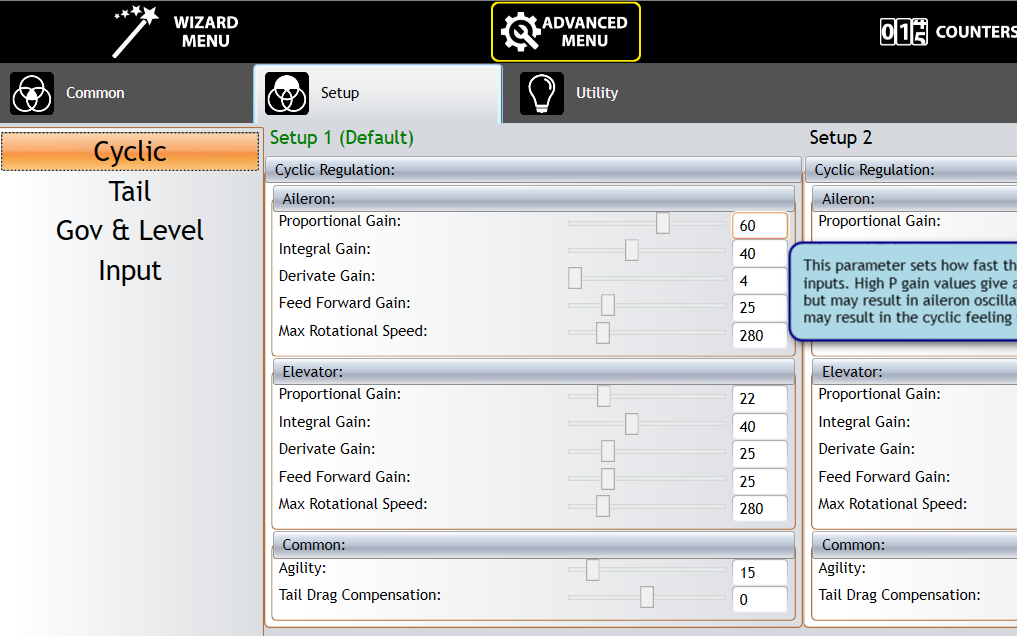
Cyclic and Tail settings
Go to the Advanced Menu and enter the reference settings For Cyclic and Tail provided by Jonas W in the next section. NOTE: Don’t copy the numbers in the below screenshot as they may be out-dated.
Reference Brain2 settings for M4 helicopter
You can use the below setting provided by the M4 helicopter Jonas Wackershauser as a good baseline for your M4 helicopter.
