Since ExpressLRS release v3.3.0 SBUS protocol support has been added to ELRS receivers. This means you can use any ELRS receiver with OMPHobby flight controllers like M1 and M2 helicopters and S720/T720 airplanes as well as Goosky S1 / S2.
The newer helicopters like OMPHobby M2 V3 Pro and Goosky S2 Max naively support Crossfire (CRSF) so telemetry information is available as well.
This guide will show how to use the XR2 ELRS receiver with both SBUS and CRSF interfaces.
The XR2 ELRS receiver is perfect for small models like M1 and M2 since it is compact and very light with compact ceramic antenna. Please make sure you have v3.3.0 or later firmware on the ELRS receiver.
Transmitter Channel resolution setting
ELRS has different switch modes for different channel resolutions. We want to have at least 5 channels with full resolution. The Hybrid and Wide switch modes are not sufficient for Helicopter use as they offer only 4 channels with full resolution. We need to use the “8 channel full resolution mode“
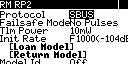
Run the ELRS LUA script. SYS->TOOLS->ExpressLRS
Change Packet rate to 333Hz. Currently this is the maximum rate that supports 8 Channel Full-resolution mode.
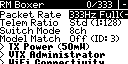
Change Switch Mode to 8ch

For more details about switch mode and channel resolution Please refer to the ELRS Switch Config guide.
SBUS mode
(For CRSF mode please scroll down)
You will need the SBUS receiver adapter cable OSHM2076 and solder it yourself. Alternatively you can purchase a pre-soldered receiver from us with updated firmware and SBUS configuration.
SBUS Connection
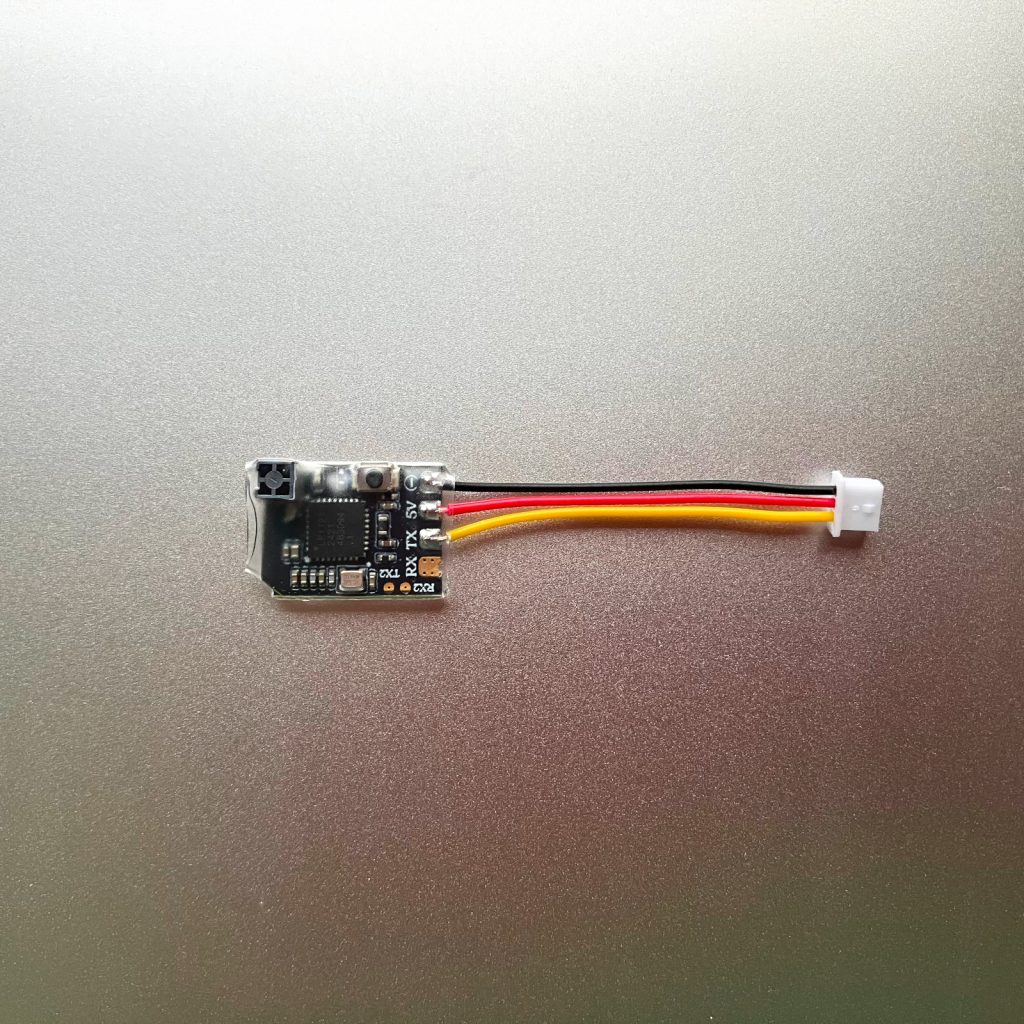
If you wish to solder it yourself you can solder the SBUS receiver adapter cable to the receiver as shown in the below picture.

Use the heat shrink wrap provided with the receiver to cover and protect the receiver.
Connect the JST connector to the SBUS port on the Helicopter Controller.
Transmitter Model Configuration
Use the EVO XSR model configuration from our configuration file for the respective Radio Transmitter.
Transmit power
WARNING: In SBUS mode, Dynamic Power should not be used at the ELRS Transmitter. Instead, a fixed power (e.g. 25mW) should be used. This is because in ELRS, Channel 5 is reserved for ARM/DISARM switch and it corresponds to Stability/Rescue vs 3D mode on the M1/M2/S1/S2 helicopter. When the Channel 5 is disarmed (~1000uS), the Transmitter RF output power is reduced if Dynamic Power is enabled and this increases the chances of RF link loss if the model is used in DISARMed state. Using fixed power is crucial to avoid this problem.
In any case, we recommend you perform a range check with both stability mode on and off to ensure the radio range is sufficient in both cases.
Binding
It is highly recommended to remove the main and tail rotor blades from the helicopter to prevent any injury/damage on accidental motor start up.
- Power off your transmitter/radio.
- Power-cycle the receiver 3 times. This can be done by rapidly connecting and disconnecting the battery 3 times. On the 3rd time don’t disconnect the battery 🙂
- Make sure the LED is doing a quick double-blink, which indicates the receiver is in bind mode.
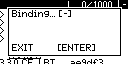
- Power up your transmitter/radio and use the [BIND] button on the ExpressLRS Lua script, which sends out a binding pulse. The Popup will briefly show up and then disappear.
- If the receiver LED turned into a solid light, it’s bound!
SBUS protocol selection
Run the ELRS LUA script. SYS->TOOLS->ExpressLRS
Scroll down to Other Devices and press ENT.
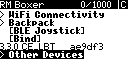
You will now see the currently bound receiver. Select it and press ENT.

In the receiver options Scroll to PROTOCOL and choose SBUS.
Scroll down and EXIT the receiver options. Exit the ELRS lua script.
Power cycle the helicopter and this time the Flight controller should detect the receiver SBUS and make the initialization completion beeps.
CRSF (Crossfire) mode
For OFS3 (OMPHobby M2 V3 Pro / M2 EVO MK2) or Goosky S2 Max we need to setup the Receiver in Cossfire (CRSF) mode. Crossfire is a 4 wire bi-directional interface which allows control as well as telemetry.
You can choose to solder the Molex 4-pin connector yourself or purchase the XR2 pre-soldered with the connector from us.

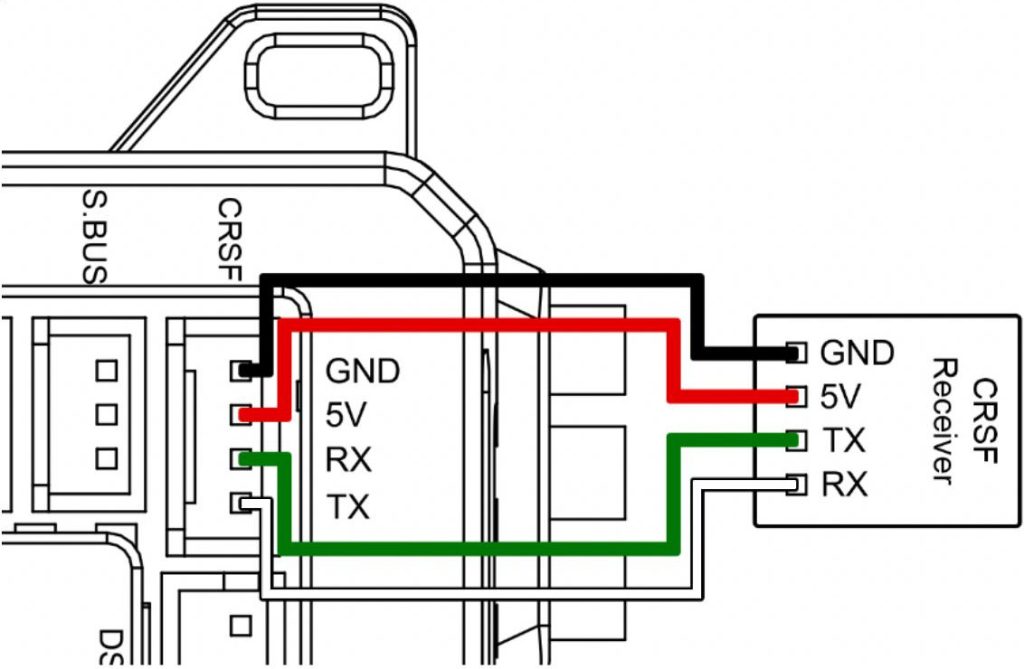
CRSF connection
If you wish to solder the connector yourself you can do it as shown in the picture below.
Transmitter Model Configuration
Use the OFS3 model configuration from our configuration file for the respective Radio Transmitter.
Binding
It is highly recommended to remove the main and tail rotor blades from the helicopter to prevent any injury/damage on accidental motor start up.
- Power off your transmitter/radio.
- Power-cycle the receiver 3 times. This can be done by rapidly connecting and disconnecting the battery 3 times. On the 3rd time don’t disconnect the battery 🙂
- Make sure the LED is doing a quick double-blink, which indicates the receiver is in bind mode.
- Power up your transmitter/radio and use the [BIND] button on the ExpressLRS Lua script, which sends out a binding pulse. The Popup will briefly show up and then disappear.
- If the receiver LED turned into a solid light, it’s bound!
CRSF protocol selection
ELRS / XR2 receivers come setup with CRSF protocol by default. You can verify it like so
Run the ELRS LUA script. SYS->TOOLS->ExpressLRS
Scroll down to Other Devices and press ENT.
You will now see the currently bound receiver. Select it and press ENT.
In the receiver options Scroll to PROTOCOL and choose CRSF.
Scroll down and EXIT the receiver options. Exit the ELRS lua script.
Pre-flight check and flight
Perform the pre-flight checks to see that all controls are responding correctly.
Attach the rotor blades and go for a test flight.