This guide shows you how to use the MSH Brain2 / Ikon2 Flybarless controller with an ExpressLRS receiver. In this article we use the Radiomaster RP3-H receiver but the instructions are universal for all receivers using CRSF (Crossfire) serial protocol.


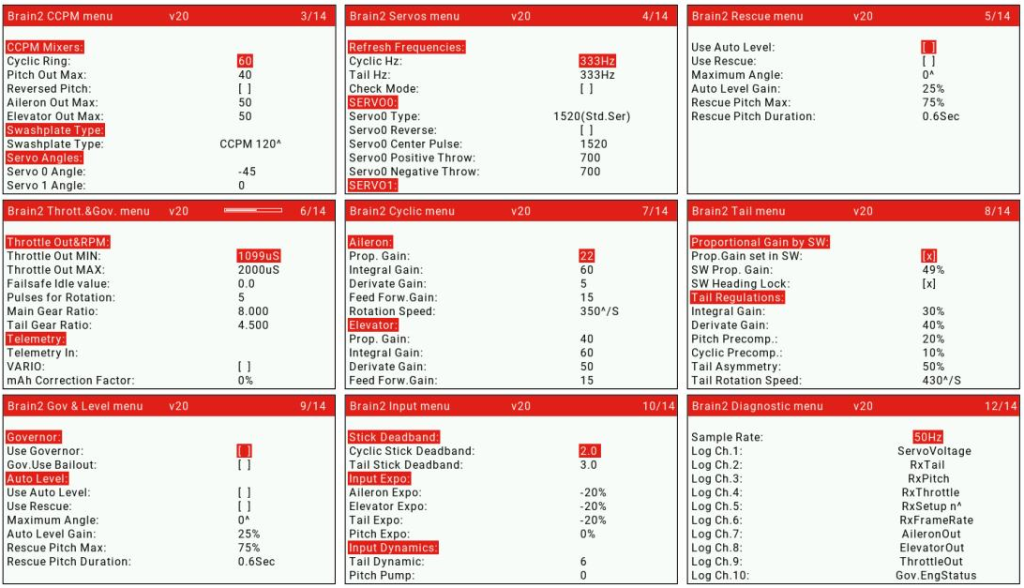
As Crossfire is a full-duplex serial interface most ELRS receivers support telemetry. MSH provides EdgeTX/OpenTX Brain 2 LUA script App that can be used to configure the FBL controller directly from your EdgeTX Radio Controller. The image below shows some of the screens from the Brain2 LUA script App.
Note: As of now MSH provides the configuration LUA script app only for TX16S/Horus based radio controllers. Contact MSH if you need LUA script for other Radio Controllers.
Connection
We will use the Radiomaster RP3-H receiver as it is perfect for the job. It comes with the necessary JST-GH to JST servo adapter cable.


You will need an empty JR/Futaba servo connector housing and a 3-pin Molex Picoblade connector to connect this to the Brain 2 unit.
Take an empty JR/Futaba connector housing and plug Black, Red and Green wires into it as shown below.

For the Telemetry line we need to use a 3-pin Picoblade connector.

Connect the yellow wire from the picoblade connector to the white wire of the receiver cable. The entire cable assembly is shown below.

Plug RP3-H receiver to the Brain2/Ikon2 unit with the prepared cable assembly.

Brain 2 / Ikon 2 Configuration
Receiver Selection
Connect Brain 2 to Configuration App. Go to the Receiver Selection screen and choose Crossfire.

Binding to Receiver
The receiver will not receive power through USB so connect BEC power or 4.8V battery to CH1 or CH2 port.
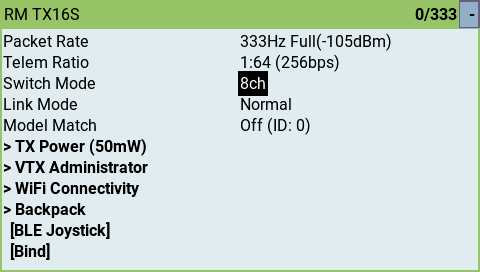
Ensure that Packet Rate is set to 333Hz Full and switch mode is set to 8Ch. This is to ensure we have full resolution and range on all channels. NOTE: CH5 is still limited to 2 state channel for ARMing. For more details about different switch modes and their limitations please see ExpressLRS Switch Configs.
Now bind the Receiver to the Transmitter.
- Power ON and power Off the receiver 2 times. Power ON the third time. Now receiver is in bind mode. LED will blink twice repeatedly.
- Press Bind on the ELRS LUA App.
Receiver Advanced Setup
IMPORTANT: Click on Advanced Menu and choose Receiver section.
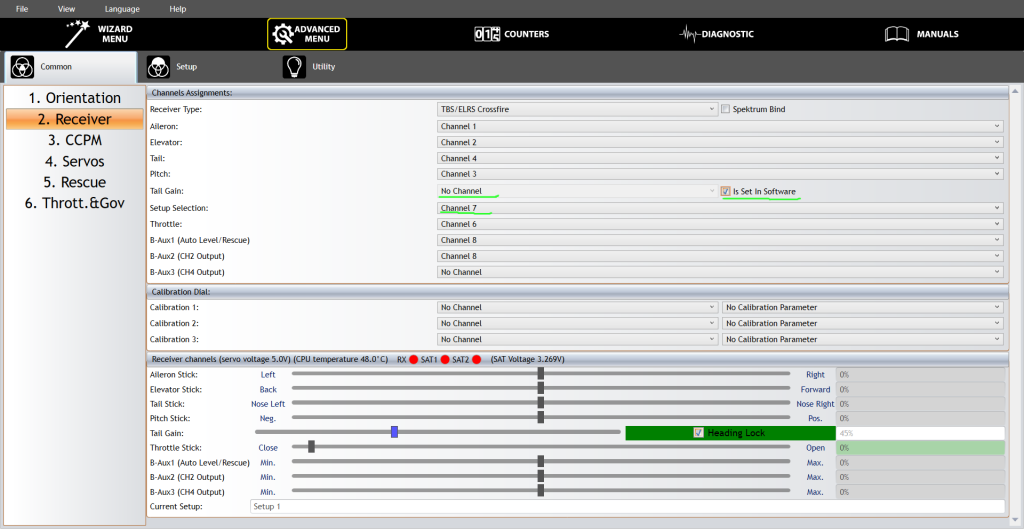
- Change Tail Gain channel to “No Channel”. Tick “is Set in Software” checkbox.
- Change Setup Selection channel to “Channel 7”.
The reason for this is that we will be using 8 channel Full resolution 333Hz rate mode. Channel 5 is used for ELRS Arming and is only 2 states. We cannot use that for Setup selection since it needs 3 states. We don’t want to interfere with ExpressLRS Arming logic so we leave CH5 exclusively for Arming purposes.
The Tail gain can be set in the Brain configuration software for each of the 3 Setup modes
Transmitter Setup (input)
Go back to Wizard menu and choose Transmitter setup. Verify that all sticks and switches are working as desired.

EdgeTX Configuration
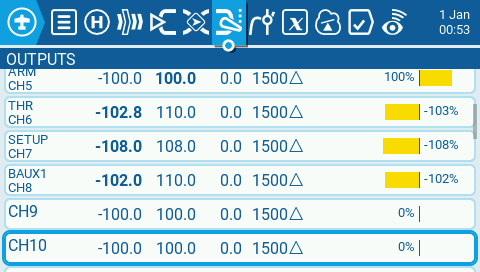
Channel Output Configuration
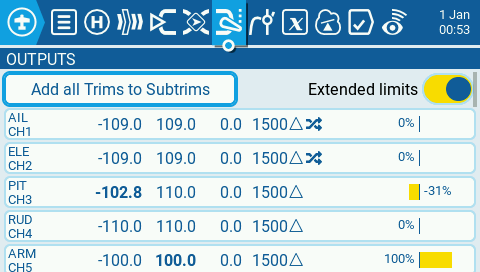
Below pictures shows Channel configuration. MDL->OUTPUTS.
- Enable Extended Limits.
- Ensure center is 1500μS for all channels.
- Adjust Minimum and Maximum Endpoints so achieve -100/+100 on Brain Application.
- Adjust Channel Invert to match stick polarity.
Telemetry Configuration
- Open the Telemetry Page. MDL->Telemetry
- Delete all existing sensors. Then choose Discover New.
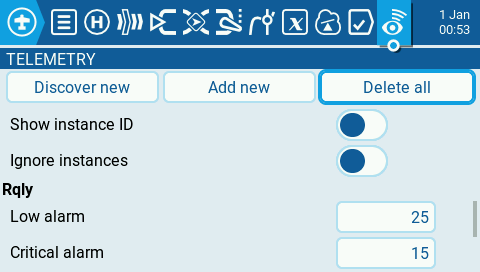

- Wait for few seconds till all sensors are discovered. Then press Stop.

Installing Brain2 ELRS LUA App
- To adjust the Brain 2 parameters directly from your Transmitter you can use the Edgetx Brain2 Crossfire App Package.
- Extract the Brain2_CRSF.lua file to the SCRIPTS->TOOLS directory on the Transmitters SD card.
- To Launch the configuration App, got to SYS->TOOLS->Brain2_CRSF.
Remember to save and exit the App and do bench checks before flying the model.
Reference Edgetx configuration For Brain2/Ikon2 with ELRS
You can use the below reference configuration to jump start. Please verify all parameters and perform necessary bench tests before attempting to fly with this configuration. We are not responsible for any damages resulting from use of this configuration.